How to Create a Beautiful Christmas Table with Hanging Greenery
Christmas is one of my favourite times of the year, and I particularly love creating a beautiful table where family and friends can gather, share a meal and enjoy each other’s company.
Over the years, I’ve experimented with all sorts of Christmas table decorations, from traditional centrepieces to more elaborate arrangements. One Christmas, I decided to try something a little different and take the decorations above the table instead.
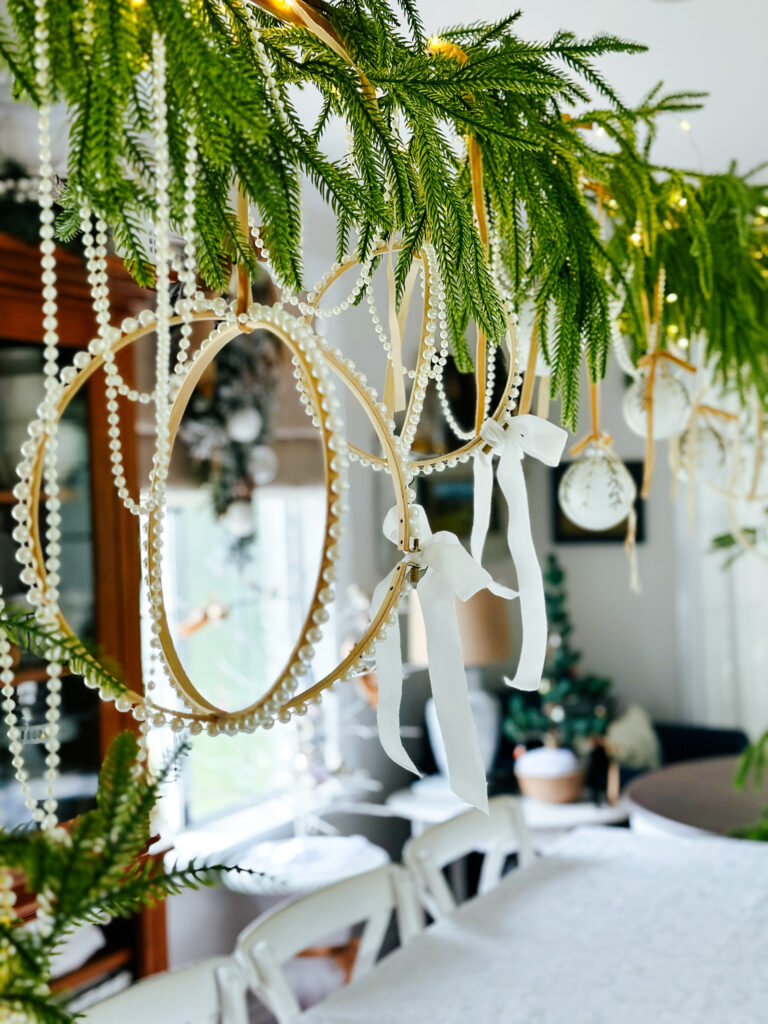
Using an over-the-table decorating rod, some greenery, twinkling fairy lights, strands of pearls and a few handmade decorations, I created a beautiful hanging display that became the centrepiece of our Christmas table.
The best part? It looked quite elaborate, but the actual process was surprisingly straightforward.
If you’re looking for Christmas tablescape ideas that are a little different, this is a lovely way to create something special without taking up valuable space on your table.
Why I Love Hanging Christmas Table Decorations
One of the challenges with decorating a Christmas table is finding the right balance between making it look beautiful and leaving enough room for everything else.
After all, there still needs to be space for plates, glasses, food and, most importantly, the people gathered around it!
Taking the decorations above the table is a wonderful solution.
It creates a beautiful focal point without cluttering the table itself. It also gives you an opportunity to introduce different textures, soft lighting and hanging ornaments that might otherwise get lost amongst the place settings.
For this particular Christmas table, I wanted a soft, elegant look with plenty of greenery, pearls and warm lighting.
And because I love adding a handmade element wherever possible, I decided to make some simple pearl and embroidery hoop decorations to complete the arrangement.
How to Create a Hanging Christmas Greenery Display
The starting point for this Christmas table was an over-the-table decorating rod.
These rods are such a clever idea because they allow you to create a hanging arrangement without needing to attach decorations directly to your ceiling.
What I Used
- An over-the-table decorating rod
- Three artificial green garlands
- Battery-operated fairy lights
- Strands of decorative pearls
- Embroidery hoop decorations
- Glass Christmas baubles
- Neutral ribbon
- Cable Ties to attach everything to the rod
Step 1: Set Up the Decorating Rod
I started by positioning the decorating rod over the table.
Before adding any decorations, make sure the rod is properly assembled and secured according to the manufacturer’s instructions.
It’s also worth checking the weight capacity of your rod, particularly if you’re planning to add several garlands and hanging ornaments.
Step 2: Add the Greenery
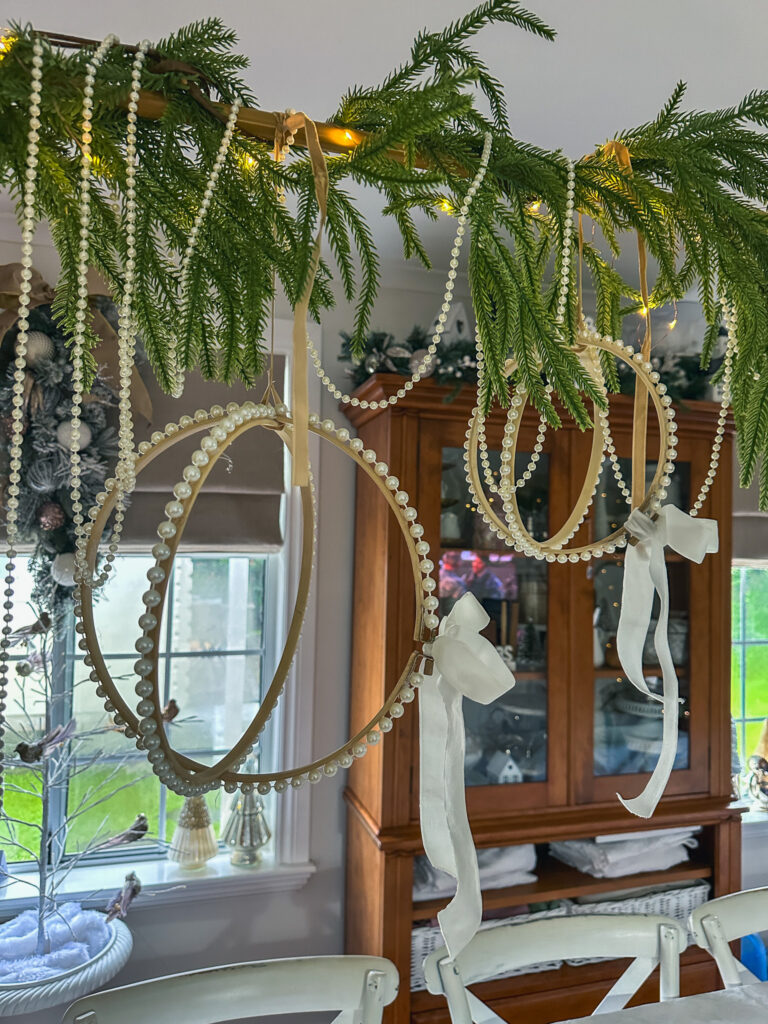
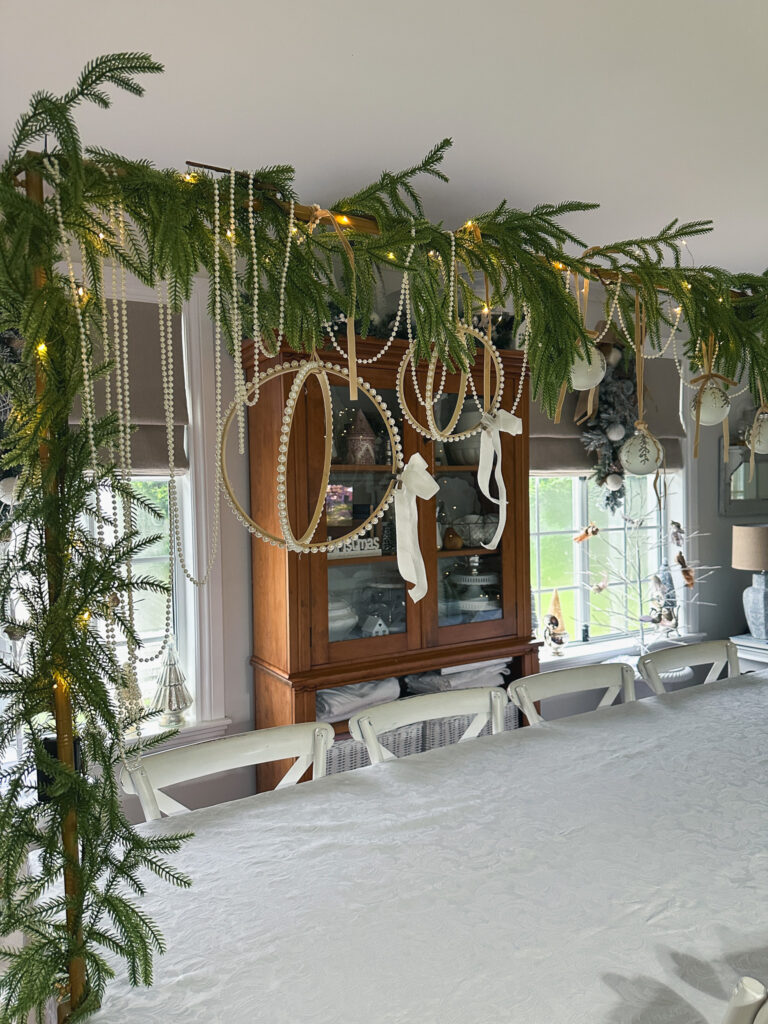
Next, I attached three green garlands along the rod, securing them in place with cable ties.
I wanted the greenery to look full and natural rather than too structured, so I arranged the branches to create a softer appearance.
Using several garlands helped give the display plenty of volume and provided a lovely base for the remaining decorations.
Step 3: Add Some Twinkling Lights
Once the greenery was in place, I threaded battery-operated fairy lights through the garlands.
I love using warm fairy lights at Christmas. They create such a welcoming atmosphere, particularly once the sun starts to go down.
Battery-operated lights are also a practical choice because you don’t need to worry about running electrical cords across your dining area.
Make sure the lights are suitable for decorative use and keep the battery packs accessible.
Step 4: Drape the Pearl Strands
This was one of my favourite parts of creating the display.
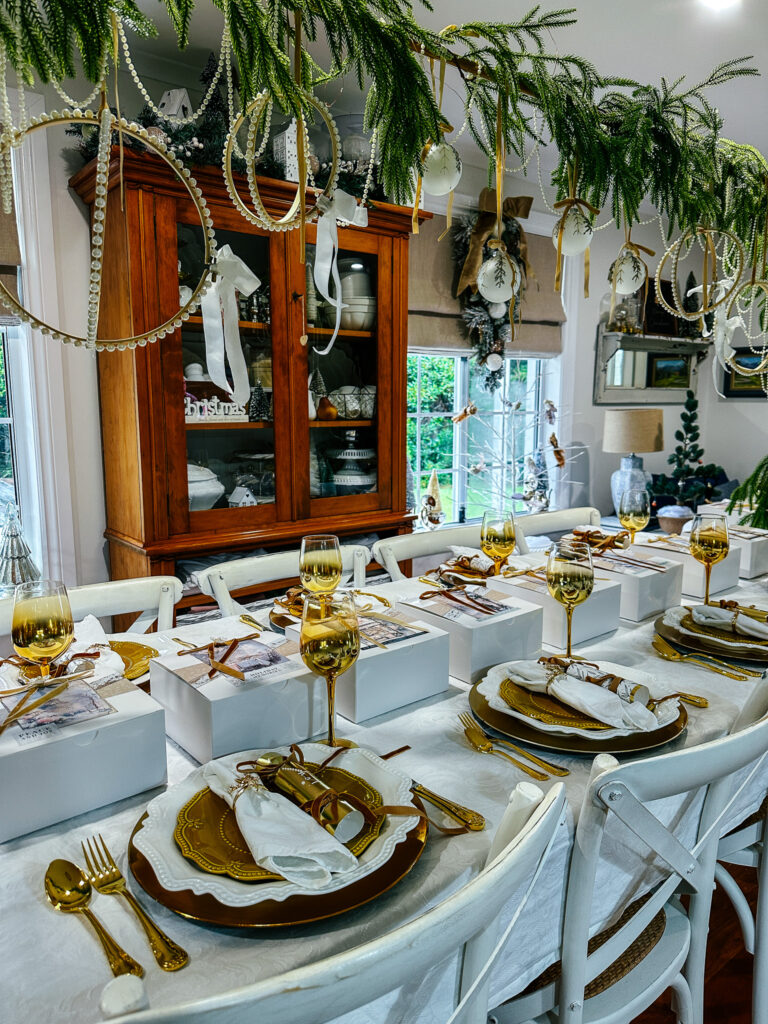
I added long strands of pearls, allowing them to hang in loops of different lengths beneath the greenery.
Rather than making every loop exactly the same, I varied the lengths to create a more relaxed and interesting arrangement.
The pearls added a beautiful contrast against the greenery and introduced a little elegance without making the display feel overly formal.
Sometimes it’s these small details that make the biggest difference.
Step 5: Add the Hanging Christmas Decorations
To finish the arrangement, I added some handmade pearl and embroidery hoop decorations, along with beautiful glass Christmas baubles.
I attached the glass baubles using neutral ribbon, which worked beautifully with the natural greenery and soft pearl details.
The combination of glass, pearls, greenery and ribbon created a lovely mix of textures.
I also varied the hanging heights to give the arrangement a little more movement and interest.
A little safety tip: Always use secure fastenings and lightweight decorations where possible. Keep hanging items well above guests’ heads and away from candles or other heat sources.
DIY Pearl and Embroidery Hoop Christmas Decorations
One of the things I enjoy most about decorating for Christmas is finding simple ways to create something myself.
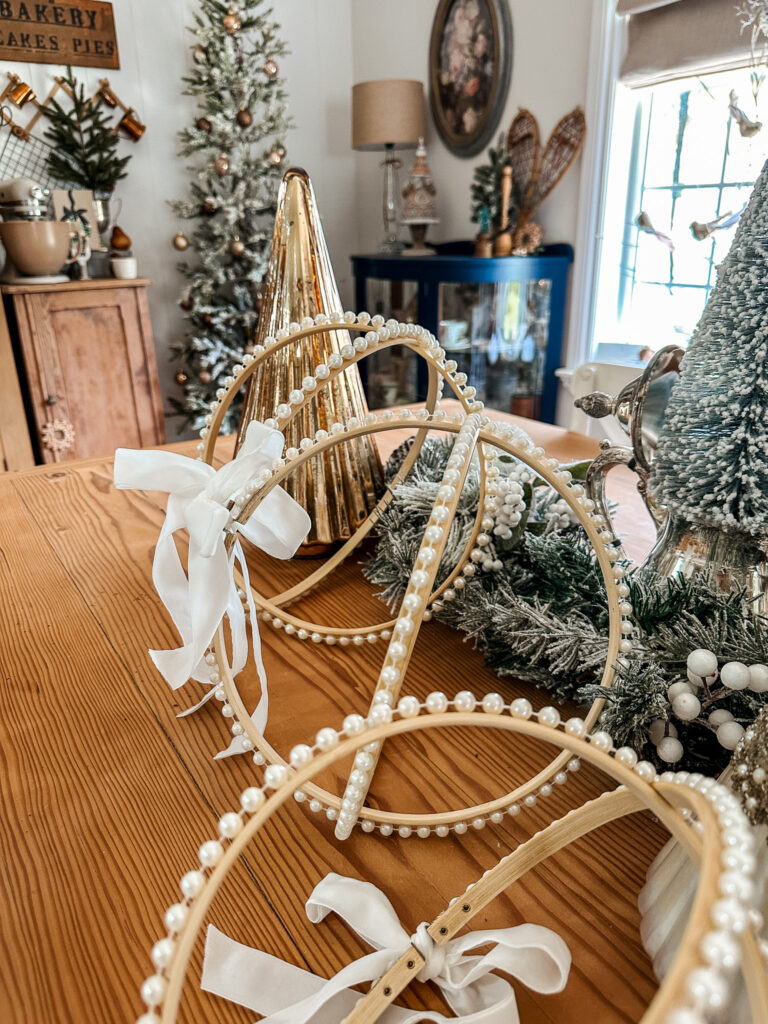
These pearl and embroidery hoop decorations were a lovely addition to the hanging greenery display, and they’re a project you could easily adapt to suit your own Christmas colours.
The combination of natural timber, pearls and soft ribbon gives them a timeless look.
What You’ll Need
- Wooden embroidery hoops in different sizes
- Decorative pearl strands
- Neutral ribbon for bows
- Hot glue gun
- Scissors
- Ribbon or cord for hanging
How to Make Them
Step 1: Prepare your embroidery hoops
Start with your wooden embroidery hoops. I love the natural timber finish because it works beautifully with the pearls and greenery.
Step 2: Add the pearls
Arrange the pearl strand around the outer edge of the hoop, securing it as you go with your hot glue gun.
Take your time with this step so the pearls sit neatly around the edge.
Step 3: Add a ribbon bow
Once the pearls are secure, add a soft ribbon bow to the bottom of the hoop.
I chose a neutral ribbon because I wanted the decorations to complement the rest of the table rather than compete with it.
Step 4: Attach a hanging ribbon
Finish by adding a ribbon or cord so the decoration can be suspended from the greenery.
These decorations are so versatile. You could make small ones to use on a Christmas tree or wreath, or hang them in a window.
Watch the DIY video below to see how I created my pearl and embroidery hoop Christmas decorations.
Styling the Christmas Table Beneath the Greenery
With the overhead decorations complete, it was time to turn my attention to the table itself.
Because there was already so much happening above the table, I wanted to keep the place settings relatively simple.
I started with a white tablecloth, which is something I use quite often when entertaining. It provides a beautiful neutral base and allows the other decorations to shine.
For the place settings, I combined white and gold elements, adding beautiful gold-toned glassware and Christmas crackers.
I also included individual gift boxes at each place setting, which added another thoughtful detail. I filled these boxes with homemade goodies.
I love having something small waiting for guests when they sit down. It doesn’t need to be expensive or elaborate; it’s simply a lovely way to make everyone feel welcome.
The finished table had a wonderful balance between the more elaborate hanging decorations and the simpler place settings underneath.
Tips for Creating Your Own Beautiful Christmas Table
If you’d like to recreate something similar, here are a few things I’d suggest.
Choose a simple colour palette. I used greenery, pearls, white, gold and natural ribbon. Keeping the colours consistent helped everything work together.
Vary the lengths of your hanging decorations. Different lengths create movement and make the display feel more relaxed.
Use battery-operated lights. They’re a simple way to introduce soft lighting without having cords running across your table.
Include something handmade. Even one or two DIY decorations can give your Christmas table a more personal feel.
Don’t forget the practical details. Make sure guests can sit comfortably, see each other across the table and enjoy their meal without decorations getting in the way.
And perhaps most importantly, don’t feel you need to recreate everything exactly.
Use the decorations you already own, experiment with different colours and make the arrangement your own.
A Beautiful Christmas Table Doesn’t Have to Be Complicated
Looking back at this Christmas table, what I love most is how a few relatively simple elements came together to create something quite special.
The greenery provided the foundation, the fairy lights added warmth, the pearls brought a little elegance, and the handmade decorations gave it personality.
It was a lovely setting for a Christmas gathering, but the real joy was having everyone together around the table.
Because, as much as I love decorating, it’s always the people and the memories that matter most.
And if creating your own Christmas table feels a little overwhelming this year, we can help with that too! Our Christmas Celebration Box takes the guesswork out of decorating, with coordinated table decorations, place settings and thoughtful extras to help you create a beautiful Christmas gathering without all the stress.